Create your own legacy services
You have the ability to create your own custom endpoints and seamlessly integrate them into your apps, enhancing the capabilities of Slingr according to your specific requirements. This is particularly useful for integrating with applications not covered by the official endpoints, utilizing existing libraries, and more.
The process of creating a new endpoint involves three fundamental steps:
- Endpoint Creation: Design and set up your new endpoint.
- Testing via Proxy Endpoint: Thoroughly test your endpoint using the proxy endpoint.
- Endpoint Registration: Register your developed endpoint within the Slingr developer portal.
Endpoint creation
To get started, you need to create a new endpoint. We recommend following one of these guides based on your preferred programming language:
Testing via proxy endpoint
Overview
For developing and testing your custom endpoints, there’s a dedicated endpoint designed to assist you—the Proxy Endpoint:
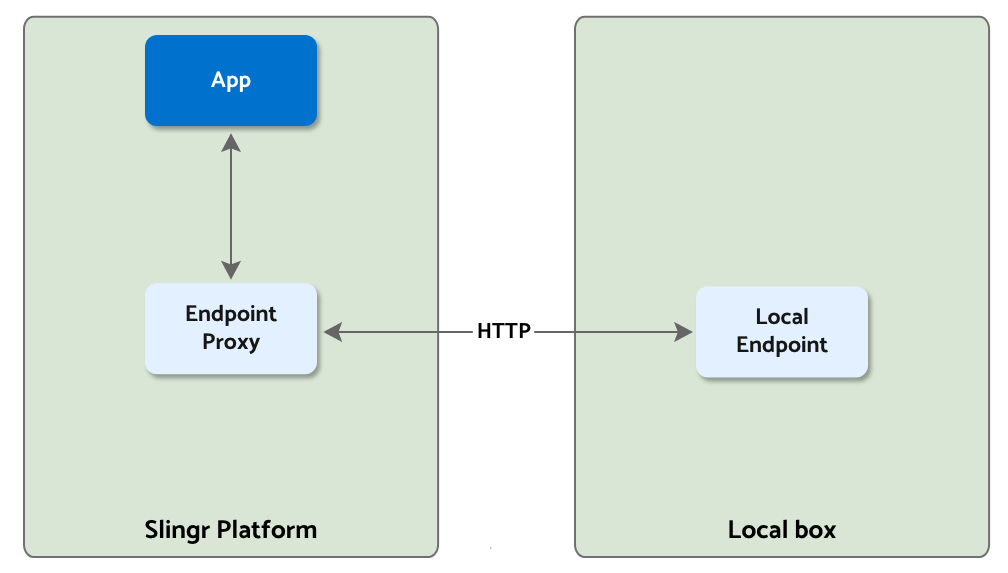
When you initiate the creation of a new endpoint in the app builder, you will find the option for the Proxy Endpoint in the list of available endpoints. This particular endpoint is designed to proxy the one running on your local machine, as depicted in the diagram above.
Proxy purposes
The proxy endpoint serves the following purposes:
- When your app invokes a function on the endpoint’s API, the proxy endpoint initiates a call to your local endpoint. This local endpoint then processes the request and forwards the response back to the proxy endpoint.
- Whenever an event occurs in your local endpoint, it is transmitted to the proxy endpoint, which subsequently relays it to your app.
- Upon loading the metadata of the endpoint (such as the
endpoint.jsondefinition file), the app retrieves this information from your locally running endpoint.
This setup enables you to run and test your endpoint locally, facilitate debugging, and observe its behavior within your app ecosystem, all without any additional requirements.
For a comprehensive understanding of the proxy endpoint’s functionality, refer to the documentation page.
Endpoint registration
Once your endpoint implementation is complete, it’s essential to register it on the platform to make it accessible to your apps. Alternatively, you can choose to make it publicly available for others to use.
Within the Developer Portal and under the Endpoints section, developers can view and manage the endpoints under their purview. This section allows you to register new endpoints, update existing ones, or disable them as needed.
When registering a new endpoint, you’ll need to provide the following information:
Label: A user-friendly name for the endpoint.Name: A unique name for the endpoint, which must match the name used in theendpoint.jsondefinition file. Note that the name cannot be modified later.Repository: The Git URL of the repository containing the endpoint’s code. The repository must be public. If it’s private, we currently support only GitHub repositories, and you’ll need to grant read access to the userslingr-builder. The URL should be inSSHformat, likegit@github.com:workspace_id/repo_name.git.Folder: Optional field for specifying the location of the endpoint within a specific folder.Type: Choose betweenJavaandNode.jsto indicate the endpoint’s programming language.Visibility: Select eitherprivateorpublic. For public visibility, any app can utilize the endpoint. For private visibility, you can specify which apps can access the endpoint.
Upon registration, the endpoint is associated with the developer who registers it. However, if necessary, ownership of the endpoint can be transferred to another account using a tool available in the endpoint editing section.
After registration, the platform will automatically detect new versions of the endpoint (identified by tags with the format v1.15.1, for example). These versions are visible when viewing endpoint details, where you can perform version management tasks:
- Trigger a search for new versions: Refreshes the list of available versions for the endpoint.
- Build a specific version: Initiates the build process for a particular version.
- Set a version as the latest/default: Designates a specific version as the latest or default choice.
Additionally, you can change the endpoint’s icon within its details. The icon should be in PNG format and have a size of 48x48px.
Please note that endpoints cannot be deleted; however, you can disable them, preventing their usage in any app.
Summary
To summarize, here’s what you need to start developing your endpoint:
- Begin by creating your local endpoint using either the Java SDK or the Node SDK.
- Next, create a proxy endpoint in your app.
- Configure the proxy endpoint to connect both to your local endpoint and vice versa.
- Develop, utilize, and test your endpoint within your app! Explore the available options for your endpoints here.
- Once it’s functioning effectively, register it and generate a version of your endpoint.
- Integrate your endpoint into your apps!