Common features
👉 Endpoints, whether they are implemented in Java, Node.js, or another technology, share common elements such as:
  - Descriptor File
    - Basic Settings
    - Deployment Settings
    - Stores
    - Functions
    - Events
    - Configuration
  - Scripts
  - Listeners
  - Flow Steps
Descriptor file settings
The descriptor file, named endpoint.json, should be located at the root of your project. It contains the definition of your endpoint, including details like the name, type of endpoint, resources, functions, events, and configuration.
Basic settings
...
"label": "Sample",
"name": "sample",
"apiVersion": "v1",
"configurationType": "GLOBAL",
"configurationHelpUrl": "https://slingr-stack.github.io/platform/app_development_model_endpoints.html",
...
These settings form the foundation of the endpoint configuration. Below, you’ll find a comprehensive explanation of each setting:
label: This represents the visible name assigned to the endpoint.name: The internal identifier of the endpoint, determining its endpoint type. Typically in lowercase with hyphens.apiVersion: Specifies the API version for communication with the Slingr Platform. Currently, the only valid value isv1.configurationType: Indicates whether the configuration applies per app or at the user-level. The following options are available:GLOBAL: Select this option if the endpoint configuration is exclusive to the app level (within the app builder).PER_USER: Opt for this option if, in addition to the global configuration, each user requires specific settings to establish a connection to the endpoint. For instance, this scenario applies to the Google Calendar endpoint, where users need to authorize the endpoint individually using OAuth.
configurationHelpUrl: An optional URL providing documentation related to endpoint configuration.
Deployment settings
...
"deployment": {
    "profiles":[
        {
            "name": "default",
            "label": "Default",
            "memory": 512,
            "offHeapMinFactor": 1.5,
            "description": "Default configuration"
        }
    ],
    "type": "java",
    "allowMultipleInstances": true
},
...
The deployment section allows you to adjust technical options for running the component.
Within this section, you can define different profiles for a single endpoint. Essentially, a profile determines the memory allocation for the endpoint (with CPU adjustment happening automatically). The following settings are available for each profile:
name: The internal name of the endpoint. It must not contain spaces or special characters.label: The visible name of the profile, displayed to users in the app builder.memory: The amount of memory required by the endpoint. This represents the total memory utilized by the process.offHeapMinFactor(optional, exclusive to Java endpoints): This indicates the factor for non-heap memory allocation. If your endpoint requires more native memory, you might need to increase this value. The default value is at a minimum of1.description: A description of the profile shown to developers. It should provide useful information to aid in selecting the appropriate profile.
In addition to these settings, there are other configuration options available for the endpoint’s deployment:
allowMultipleInstances: This can be set totrueorfalse. When set totrue, multiple instances of the endpoint can be configured. Requests will be distributed among instances, so the endpoint should not maintain any instance-specific state. For greater reliability, consider setting this tofalse, enabling it only when scaling is necessary and when instance statelessness is ensured.type: Indicates the technology used for the endpoint. This information enables the platform to perform the appropriate build for the endpoint. Possible values include:java,java8,java11, andnodejs.
Descriptor file stores
...
"stores": [
    {
        "name": "test_data_store",
        "indexes": [
            {"fieldA": 1},
            {"fieldB": 1, "fieldC": -1}
        ]
    }
],
...
If your endpoint needs to store data persistently, you will need to define “stores.” In these stores, you can save JSON documents, search for them using keys, update, or remove them. It’s similar to a simple database that you can utilize within your endpoints.
For each store, you need to define the following settings:
name: the name of the store. It cannot contain spaces or special characters.indexes: if the store is going to contain many documents, it’s beneficial to add indexes to optimize how you access the data. You can define several indexes. For each index, you need to specify the field(s) included in the index and the direction. Use1for ascending and-1for descending.
Descriptor file functions
...
"functions": [
    {
        "label": "Random number generator",
        "name": "randomNumber",
        "description": "Generates a random integer"
    },
    {
        "label": "Ping",
        "name": "ping",
        "description": "The service returns the sent value for the Pong event",
        "callbacks": [
            {
                "name": "pong",
                "maxWaitingTime": 60000,
                "maxExpectedResponses": 1
            }
        ]
    },
    ...
],
...
Functions are fundamental for interacting with endpoints, as they can be invoked from the app using scripts. A set of parameters is sent to the function, which is then received by the endpoint. The function can return a result. For more detailed information on how functions work, refer to the documentation.
In this scenario, you do not need to specify any parameters explicitly. The function’s implementation will receive a JSON and should utilize the necessary parameters.
Here are the settings for a function:
label: This is the human-friendly name of the function.name: The function’s name. This name will be used to call the function and must match the name defined in your implementation.description: A description of the function’s purpose. This field is optional.callbacks: When a function’s execution might take a considerable amount of time, rather than blocking the caller, you can define callbacks. These callbacks will be triggered once the results are ready or when an event related to the function call occurs. Note that these callbacks need to be defined as events too, as they are essentially events tied to a function call. Refer to the documentation on endpoint callbacks for a comprehensive understanding of how they are utilized within apps.Callbacks possess the following properties:
name: This is the callback’s designated name to be used in the code. It should also match the event’s name defined in the endpoint (refer to the events section below).maxWaitingTime: This indicates the maximum expected duration for the callback to be invoked since the function is triggered. Setting a reasonable waiting time is crucial, as resources will only be released after this timeout or after the callback is called (refer to the next property as well).maxExpectedResponses: By default, once the callback is called, resources are released and it won’t be called again. However, there are situations where the callback might be triggered multiple times by a single function execution. In such cases, you should specify the maximum number of times this callback can be invoked.
Descriptor file events
...
"events": [
    {
        "label": "Inbound Event",
        "name": "inboundEvent",
        "description": "Event send for the endpoint each time that a POST request to the root path of the web service."
    },
    {
        "label": "Pong",
        "name": "pong",
        "description": "Callback event for the Ping function"
    },
    ...
],
...
Events originate at endpoints and are sent to the app, where they can be processed through listeners. For detailed instructions on how to process events from endpoints, refer to the documentation here.
An event’s definition contains a few key properties. The content of the event is defined by the endpoint, and the app receives it as JSON. However, there’s no need to define the structure here.
These are the properties of events:
label: This is the name developers will see in the app builder.name: This is the internal name of the event used for identification in the code.description: A concise explanation of what triggers this event and when it is triggered.
Descriptor file configuration
Endpoints can be configured within the app builder. Typically, developers will need to enter API keys and other required settings for the endpoint to function.
There are two types of configurations that an endpoint can have:
- Global configuration: This configuration is applied when you access the endpoint in the app builder. All endpoints can have this type of configuration.
- User configuration: Users will encounter this configuration when they navigate to
My Integrationsin the secondary menu of the app runtime. This configuration is specific to individual users and is only available for endpoints where theconfigurationTypesetting is defined asPER_USER.
Configurations are defined at the root of the descriptor using the following structure:
...
"configuration":[
  ...
],
"userConfiguration":[
  ...
]
Each configuration is described by a set of fields, which follow the structure outlined below:
{
    "label": "Field",
    "name": "field",
    "type": "password",
    "multiplicity": "one",
    "required": true,
    "visibility": @config.otherField,
    "showLabel": true,
    "defaultValue": "12345678",
    "typeOptions": {}
}
Here is a brief description of each property:
label: This is the label displayed on the left side of the field. It is required ifshowLabelis set totrue(default value).name: Represents the key under which the value will be stored in the configuration. This key is also accessible through theconfigglobal variable.type: The type of the field. This determines thetypeOptionsfield. More information about types is provided below.multiplicity: There are two possible values:one(default value) ormany. Themanyvalue allows defining multiple values for this field (as an array).required: Indicates whether the field is mandatory. It can be represented with a boolean value (trueorfalse), a reference like@config.otherField, or an expression such asconfig.otherField && utils.isPlaceHolder(config.anotherValue).visibility: Indicates if the field is visible in the UI. It can be represented with a boolean value (trueorfalse), a reference like@config.otherField, or an expression likeconfig.otherField && utils.isPlaceHolder(config.anotherValue).showLabel: If set tofalse, the label will not be displayed, and the field will use the entire available width. It is represented with a boolean value (trueorfalse).defaultValue: The value set by default if a value has not been set by the user.typeOptions: Only valid for some types; please refer to the next section for more details.
Next, we will describe the available field types:
Label
Type: label
A label represents a read-only value that will not be stored as part of the configuration. It serves as informational content for users and developers.
{
    "label": "Simple",
    "name": "simpleLabel",
    "type": "label",
    "value": "Sample Complex endpoint"
}
This field type has no options.
Information
Type: info
This type enables the display of an alert that accommodates the insertion of HTML code.
{
    "label": "Information",
    "name": "information",
    "type": "info",
    "typeOptions": {
        "alertType": "warning"
    },
    "value": "Follow these points to generate a new credentials:<ul><li>Access to the Dev Console</li><li>Create a new project. Copy the 'Project Name' in the configuration form.</li><li>...</li></ul>"
}
Options:
alertType: Describes the color or format for display. Valid values include:info,success,warning, anddanger.
Fields group
Type: fieldsGroup
This special type of field enables nesting other fields within it, providing a structured way to organize and group fields.
{
    "label": "Labels",
    "name": "labels",
    "type": "fieldsGroup",
    "typeOptions": {
        "fields":[
            {
                "label": "Simple",
                "name": "simpleLabel",
                "type": "label",
                "value": "Sample Complex endpoint"
            },
            {
                "label": "Concatenation",
                "name": "concatenation",
                "type": "label",
                "value": "'Prefix ['+(config.entity ? config.entity : 'No entity') +'] > ['+(config.entityField ? config.entityField : 'No field')+'] > ['+(config.entityAction ? config.entityAction : 'No action')+']'"
            },
            {
                "label": "Multi",
                "name": "multiLabel",
                "type": "label",
                "multiplicity": "many",
                "value": [
                    "config.entity ? config.entity : 'No entity'",
                    "config.entityField ? config.entityField : 'No field'",
                    "config.entityAction ? config.entityAction : 'No action'"
                ]
            }
        ]
    }
}
Options:
fields: The structure of this field must adhere to that ofconfigurationoruserConfiguration. Essentially, it is an array of fields. While it supports any number of levels, it’s not recommended to go beyond two levels due to limited available UI space.
Text
Type: text
This input represents a standard text field where the value is stored as a simple string. It can include validations set through type options.
{
    "label": "Email",
    "name": "email",
    "type": "text",
    "required": true,
    "typeOptions": {
        "validation": "email"
    }
}
{
    "label": "Description",
    "name": "description",
    "type": "text",
    "typeOptions": {
        "representation": "textArea",
        "numberOfRows": 4
    }
}
Options:
validation: Available validations include:email,number, andurl. All these validations allow placeholders.representation: This determines the component used to represent the field. Valid options are:inputText(default) andtextArea.numberOfRows: If the selected representation istextArea, you can specify the number of rows to be displayed.
Password
Type: password
This field is represented by a password input. The value will not be visible to the developer and will be stored as a plain string. Note that all endpoint settings are encrypted, as sensitive information is typically involved.
{
    "label": "Password",
    "name": "password",
    "type": "password",
    "required": true
}
This field type has no options.
Toggle
Type: toggle
Creates a toggle widget and will store a boolean value.
{
    "label": "Sync Automatically",
    "name": "syncAutomatically",
    "multiplicity": "one",
    "type": "toggle"
}
This field type has no options.
Script
Type: script
This field can store a script (JavaScript) that can be utilized later in the app.
{
    "label": "Action Script",
    "name": "actionScript",
    "type": "script",
    "multiplicity": "one",
    "typeOptions": {
        "parameters": ["day", "amount"]
    }
}
You can invoke this script during runtime using the following approach:
app.endpoints.sampleEndpoint.config.actionScript({day: '2019-02-15', amount: 5});
Options:
params: A list of parameters that this function will accept. Only these parameters will be passed to the function when it is executed.
Button
Type: button
This component allows the execution of an action when clicked. No information is stored as value of this field. This
component does not allow multiplicity equals to many.
{
    "label": "Set email",
    "name": "setEmail",
    "type": "button",
    "typeOptions": {
        "color": "info",
        "action": "if (!config.inputs.email) { config.inputs.email = 'test1@slingr.io'; }"
    }
}
Options:
color: The available values areinfo,default,primary,success,warning, anddanger.action: This is an expression that will be parsed and executed as a JavaScript function on the client side. Some interesting examples can be found in the official endpoints. For instance, the Google Calendar endpoint uses buttons to trigger the OAuth process.
Buttons group
Type: buttonsGroup
This component creates a group of buttons. If multiplicity is set to true, multiple values can be selected.
{
    "label": "Multi",
    "name": "multiSwitcher",
    "type": "buttonsGroup",
    "multiplicity": "many",
    "required": true,
    "defaultValue": ["danger", "info"],
    "typeOptions": {
        "possibleValues":[
            {
                "label":"Danger",
                "name":"danger"
            },
            {
                "label":"Warning",
                "name":"warn"
            },
            {
                "label":"Information",
                "name":"info"
            }
        ],
        "allowCustom": true
    }
}
Options:
possibleValues: This is an array of elements withlabel(text shown as options) andname(string stored as value). These elements constitute the available options.allowCustom: Indicates whether a placeholder can be set as a value, creating an input right next to the buttons for selection. This feature is important if the value of this field might need to vary across different environments of your app.
Drop-down
Type: dropDown
This component creates a combo box. In the case of multiplicity being set to many, more than one value can be selected.
{
    "label": "Multi Custom",
    "name": "multiCustomDropDown",
    "type": "dropDown",
    "multiplicity": "many",
    "defaultValue": ["${TEST2}", "CA"],
    "typeOptions": {
        "allowCustom": true,
        "possibleValues":[
            {
                "label":"New York",
                "name":"NY"
            },
            {
                "label":"Arizona",
                "name":"AZ"
            },
            {
                "label":"California",
                "name":"CA"
            }
        ]
    }
}
Options:
possibleValues: This is an array of elements withlabel(text shown as options) andname(string stored as value). These elements constitute the available options.allowCustom: Indicates whether a placeholder can be set as a value, creating an input next to buttons for selection. This feature is important if the value of this field might need to change between different environments of your app.
Entity
Type: entity
This component allows the selection of an existing entity defined within the app. The value will be stored as a reference to metadata and will be updated accordingly when changes occur. For instance, if the entity’s name changes, the configuration of the endpoint will be automatically updated. Similarly, if the entity is deleted, the value will be cleared.
{
    "label": "Entity",
    "name": "entity",
    "type": "entity"
}
This field type has no options.
Entity field
Type: entityField
Allows to select an existing entity field. The value will be stored as a reference to metadata, being refactored in the same way when changes happen. For example, if the entity field’s name changes, the configuration of the endpoint will be updated, or if the field gets deleted, the value will be cleared.
{
    "label": "Field",
    "name": "entityField",
    "type": "entityField",
    "visibility": "@config.entity",
    "required": "@config.entity",
    "typeOptions": {
        "entity": "@config.entity",
        "filterTypes": ["user", "choice"]
    }
}
Options:
entity: This option specifies the entity to which the field should belong. Valid values include the entity name or ID, or a direct reference like@config.entity.filterTypes: This option accepts a list of valid entity field types (in camel case) to filter the types of fields listed in the selector.
Entity action
Type: entityAction
Allows the selection of an existing entity action. The value will be stored as a metadata reference, which will be updated in the same way when changes occur. For instance, if the entity action’s name is modified, the configuration of the endpoint will be updated accordingly. Similarly, if the action is deleted, the value will be cleared.
{
    "label": "Action",
    "name": "entityAction",
    "type": "entityAction",
    "visibility": "@config.entity",
    "defaultValue": "addANote",
    "typeOptions": {
        "entity": "@config.entity"
    }
}
Options:
entity: This option specifies the entity to which the action should belong. Valid values include the entity name or ID, or a direct reference like@config.entity.
Entity filters
Type: entityFilters
Allows developers to define an entity filter while configuring the endpoint. The value will be stored as metadata, meaning it will be updated if fields involved in this filter are renamed or deleted.
{
    "label": "Filters",
    "name": "entityFilters",
    "type": "entityFilters",
    "typeOptions": {
        "entity": "@config.entity"
    },
    "value": {
        "_or": {
            "companyType":"Self",
            "name":"notEmpty()"
        },
        "entity":"companies"
    }
}
The value is represented as complex queries. For more information, please refer to the documentation on expressions to understand how it works and how to use it in a query.
Options:
entity: This option specifies the entity associated with the filter. Valid values include the entity name or ID, or a direct reference like@config.entity.
Entity events
Type: entityEvents
Allows the developer to define an entity event while configuring the endpoint. The value will be stored as metadata, which means it will be refactored, for example, if fields involved in this event are renamed or deleted.
{
    "label": "Events",
    "name": "entityEvents",
    "type": "entityEvents",
    "typeOptions": {
        "entity": "@config.entity"
    },
    "value": {
        "events": [
            {
                "id":"59b029ad57abd274c50074c6",
                "conditionType":"none",
                "type":"recordCreated",
                "sourceEvents": [
                    "userEvents",
                    "systemEvents"
                ]
            },
            {
                "id":"59b02a604b31a11b77001b78",
                "conditionType":"expression",
                "expression": {
                    "filters": [
                        {
                            "type":"byValue",
                            "operation":"notEmpty",
                            "field":"companyLinks.link",
                            "values":[]
                        }
                    ],
                    "entity":"companies"
                },
                "type":"conditionMet",
                "sourceEvents": [
                    "userEvents",
                    "systemEvents"
                ]
            },
            {
                "id":"59b02bf7bdcf466302006303",
                "conditionType":"script",
                "script": "1 == '1'",
                "type":"actionPerformed",
                "actions": [
                    "assignCompanyType",
                    "addANote"
                ],
                "sourceEvents": [
                    "scriptEvents",
                    "systemEvents"
                ]
            }
        ]
    }
}
This events can be used later to define listeners.
Options:
entity: this is the entity the event is associated with. Valid values are the entity name or id, or a direct reference like@config.entity.
Entity mapper
Type: entityMapper
The entity mapper field type assists in defining a mapping between the app and the endpoint. For instance, consider a scenario where the endpoint integrates with a service that holds information about companies. Instead of requiring users to manually establish a mapping between the companies in the external service and the entities in the app, the entity mapper can be utilized to configure the mapping process. Subsequently, the endpoint will utilize this configured information to automate the mapping procedure.
{
    "label": "Accounts",
    "name": "accounts",
    "type": "entityMapper",
    "typeOptions": {
        "allowToCreateEntity": true,
        "allowToSelectDirection": true,
        "recordNameField": "name",
        "fields": [
            {
                "label": "Name",
                "name": "name",
                "type": "text",
                "multiplicity": "one"
            },
            {
                "label": "Type",
                "name": "type",
                "type": "choice",
                "multiplicity": "one",
                "options": {
                    "possibleValues": [
                        {"label": "Client", "name": "client"},
                        {"label": "Prospect", "name": "prospect"},
                        {"label": "Other", "name": "other"}
                    ]
                }
            },
            {
                "label": "Relationship",
                "name": "relation",
                "type": "relationship",
                "multiplicity": "one",
                "options": {
                    "entity": "@config.entity"
                }
            },
            {
                "label": "Address",
                "name": "address",
                "type": "nestedFields",
                "multiplicity": "one",
                "options": {
                    "nestedFields": [
                        {
                            "label": "Streets",
                            "name": "streets",
                            "type": "text",
                            "multiplicity": "many"
                        },
                        {
                            "label": "State",
                            "name": "state",
                            "type": "choice",
                            "multiplicity": "one",
                            "options": {
                                "possibleValues": [
                                    {"label": "Arizona", "name": "AZ"},
                                    {"label": "New York", "name": "NY"},
                                    {"label": "California", "name": "CA"}
                                ]
                            }
                        },
                        {
                            "label": "Contact",
                            "name": "contact",
                            "type": "nestedFields",
                            "multiplicity": "many",
                            "options": {
                                "nestedFields": [
                                    {
                                        "label": "Name",
                                        "name": "name",
                                        "type": "text",
                                        "multiplicity": "one"
                                    },
                                    {
                                        "label": "Phones",
                                        "name": "phones",
                                        "type": "phone",
                                        "multiplicity": "many"
                                    }
                                ]
                            }
                        }
                    ]
                }
            }
        ],
        "hooks": [
            {
                "label": "Syncing to app",
                "name": "syncingToApp",
                "params": ["record", "oldRecord", "data"]
            },
            {
                "label": "Syncing to Endpoint",
                "name": "syncingEndpoint",
                "params": ["record", "data", "other"]
            },
            {
                "label": "Other script",
                "name": "otherScript"
            }
        ]
    }
}
Options:
allowToCreateEntity: If set totrue, aCreate entitybutton will appear, allowing developers to create an entity with the configuration described in the mapper. A popup will be displayed to insertlabelandname. If the process completes successfully, the popup will close, and the configuration will be automatically populated with entity information. This feature greatly speeds up the integration process. For instance, a Google Calendar endpoint could have a mapper for events. Instead of manually creating the entity, users could click onCreate entityto automatically generate the entity and configure it to sync with events in Google Calendar.- WARNING: If the configuration has dependencies on other fields, such as relationship fields pointing to an entity, and these dependencies are not set at the moment of triggering the create operation, the creation process will fail, showing a validation error.
allowToSelectDirection: If set totrue, a button group will be displayed, allowing the selection of one of three possible values:App to Endpoint: Changes in the app are synchronized to the endpoint.Endpoint to App: Changes on the endpoint side must be synced to the Slingr app.Both: IfallowToSelectDirectionisfalse, thedefaultDirectionfield is required.
defaultDirection: This field indicates the default synchronization direction. It can be set toappTolegacyService,endpointToApp, orboth.recordNameField: Specifies which of the root fields will be used in the entity as the record name. This value is only used when clicking theCreate entitybutton.fields: This list includes the fields that can be mapped. Mandatory fields arelabel,name, andtype. Themultiplicityis optional, with a default value ofone.- For types
choice,relationship, andnestedFields, theoptionsobject is required to specifypossibleValues,entity, andnestedFields, respectively. - All these configurations are necessary for entity creation. Furthermore, they function as filters when an entity is selected through a combo-box, filtering valid fields for each configuration.
- Values are stored as
referencesto entities and will be sent to the endpoint as paths of fields.
- For types
hooks: Hooks mainly consist ofscriptfields that will be available for endpoints. Here, users can describe function headers and the behavior when mapping alone is insufficient to convert fields from one side to the other.
Scripts
You need to configure scripts in the descriptor file:
...
"scripts":[
    "sample.js",
    "other.js"
],
...
Scripts should be placed in the scripts folder of your endpoint, and the names of the files need to match the ones in the descriptor.
These scripts are provided by the endpoint and are executed in the context of the app, similar to other scripts. For instance, they are similar to scripts in libraries. These scripts serve to streamline the usage of the endpoint or offer certain features that should be executed on the app side.
Here are some common usages of scripts in endpoints:
- Wrappers for endpoints functions: For instance, wrappers can be used to simplify the exposure of functions. These wrappers may perform actions to present the function in a more straightforward manner. Look at this sample:
In the example provided above, the user is not required to send a map when calling the function, but can directly pass the parameters.endpoint.wrapperFunc = function(a, b, c) { endpoint.func({a: a, b: b, c: c}); } - Access to app data: In cases where you need to automate a process requiring access to app data, execution on the app side is necessary. This is because querying app data is not possible from within the endpoint.
A script file will look like this:
var s = function(a, b){
    return a+b;
};
endpoint.sum = s;

endpoint.rnd = function(){
    return Math.random();
};

endpoint.PI_VALUE = Math.PI;

endpoint.rndSum = function(){
    return this.sum(this.rnd(), this.PI_VALUE);
};

endpoint.showConfig = function(){
    sys.logs.info("Endpoint: "+this._name);
    sys.logs.info(" - Token: "+this._configuration.token); // check that the variable 'endpoint' is isolated on the context
    sys.logs.info(" - Token (by ref): "+endpoint._configuration.token);
};
In this context, there is a special variable called endpoint. You can add properties to this object to make them accessible
within the endpoint. For instance, in the example mentioned above, you could invoke the function rnd by using the syntax app.endpoints.sample.rnd()
(assuming your endpoint’s name is sample).
It’s also important to note the following elements:
endpoint._name: This represents the name of the endpoint configured in the app.endpoint._configuration: This is a map containing the configuration of the endpoint.
Listeners
Listeners need to be defined in the descriptor file:
...
"listeners":[
    "dataListener.js",
    "jobListener.js",
    "endpointListener.js"
],
...
These scripts should be located in the listeners folder of the endpoint.
Within these scripts, you can dynamically define listeners. This way, when developers integrate an endpoint into their apps, listeners will be automatically incorporated.
For instance, you could utilize this feature to enable automatic data synchronization between the app and an external service. In this scenario, you would create a listener that triggers when a record is modified in the app, facilitating the synchronization of changes to the external service. Similarly, you could establish another listener to respond to incoming webhooks from the external app, ensuring that the data in the app remains updated.
To define listeners, you should add them as properties to the listeners object:
var getEntity = function(){
    return 'companies';
};

listeners.listenerForCompaniesChanges = {
    label: 'Listener for Companies changes',
    type: 'data',
    options: {
        executeInBackground: true,
        entity: getEntity(),
        events: [
            { type: 'recordCreated' },
            {type: 'actionPerformed', action: 'assignCompanyType'}
        ]
    },
    callback: function(event, record, oldRecord) {
        sys.logs.info('Entering to listener handler');
        sys.logs.info('Event: '+JSON.stringify(event));
        sys.logs.info('Record: '+JSON.stringify(record));
        sys.logs.info('Old record: '+(oldRecord ? JSON.stringify(oldRecord) : ''));
    }
};
The script can contain its own functions, such as getEntity. The name of the variable will be the name of the listener. Additionally, the user needs to configure the label of the listener, followed by the type (which can be data, endpoint, or job). The options field pertains to the specific configuration for each type. Finally, the callback defines the action executed by the listener. The header of this function is ignored; only the internal code is utilized. Developers must consider the parameters based on the listener type. Refer to the documentation for more details.
Next, we will provide a brief overview of the different types of listeners:
Data
Refer to the example below:
listeners.listenerForCompaniesChanges = { //The name will be taken from this namespace
    label: 'Listener for Companies changes', //label configuration
    type: 'data',
    options: {
        executeInBackground: true, //Indicates if the listener must be executed in background
        entity: 'companies', //The name or id of the entity listened
        events: [ //entity events configuration
            {type: 'recordCreated'}, //the type of entity event, it can be 'recordCreated', 'recordChanged', 'recordDeleted', 'actionPerformed'
            {type: 'actionPerformed', action: 'assignCompanyType'} //not all event types are available, in addition, for 'actionPerformed' the name or id can be specify
        ]
    },
    callback: function(event, record, oldRecord) {// available parameters are 'event', 'record' and 'oldRecord'
        sys.logs.info('Entering to listener handler'); //JS API functions are available
        sys.logs.info('Event: '+JSON.stringify(event));
        sys.logs.info('Record: '+JSON.stringify(record));
        sys.logs.info('Old record: '+(oldRecord ? JSON.stringify(oldRecord) : ''));
    }
};
Endpoint
See the example:
listeners.listenerForSample = { //The name will be taken from this namespace
    label: 'Listener for Sample endpoint', //label configuration
    type: 'endpoint',
    options: {
        endpoint: endpoint.name, //name of listened endpoint, it can be taken for special var called `endpoint` referring to current endpoint
        event: 'inboundEvent' //a valid event defined into `endpoint.json` dispatched by selected endpoint
    },
    callback: function(event) {// only `event` is a available parameter for this function
        sys.logs.info('Entering to listener handler'); //JS API functions are available
        sys.logs.info('Event: '+JSON.stringify(event));
    }
};
Job
See the example:
listeners.listenerForExportRecords = { //The name will be taken from this namespace
    label: 'Listener for Export records', //label configuration
    type: 'job',
    options: {
        jobType: 'exportRecords',//job type, available are: `startApp`, `stopApp`, `importRecords`, `exportRecords`, `importUsers`, `exportUsers`
        event: 'finished'// status listened, available are: `created`, `started`, `finished`, `stopped`, `resumed`, and `canceled`
    },
    callback: function(event) {// only `event` is a available parameter for this function
        sys.logs.info('Entering to listener handler'); //JS API functions are available
        sys.logs.info('Event: '+JSON.stringify(event));
    }
};
Flow steps
You have the ability to create customized flow steps for your endpoint. To achieve this, define the endpoint’s flow steps in the descriptor file:
...
"flowSteps":  [
        "numberGenerator",
        "weatherService",
        "simpleCalculator"
    ],
...
Flow steps should be defined in the flowSteps folder of your endpoint, and the names of the files must match those in the descriptor. For each defined flow step, you need to provide three files:
icon.png: This is the icon representing the step in the flow editor.step.js: This file should contain the function that will be executed as part of the step. The function must receive a unique object parameter called ‘inputs’, which contains the function parameters.step.json: This file should contain the name of the step, along with its inputs and outputs.
After creating these necessary files, you’ll need to register your endpoint with a new version. Additional details can be found in the Endpoint Registration section.
Upon registering the new endpoint version and selecting that new version from the developer portal, the newly defined flow steps will be accessible in the flow editor.
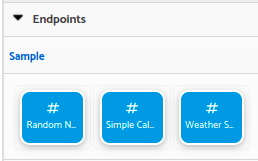
Steps available in the flow editor
Required files examples
Examples for step.js file:
/**
 * Generates a random number.
 *
 * @param {object} inputs {number} bound, This is used to get a random number between 0 (inclusive) and the number
 * passed in this argument, exclusive.
 */
step.numberGenerator = function (inputs) {

  var data = endpoint.randomNumber({bound: inputs.bound});
  return {
    "generatedNumber": data['number']
  };
};
/**
* Returns some real time weather characteristics given a city
*
* @param {object} inputs {string} city, City name, if nothing found it will use a default city (NY)
  */
  step.weatherService = function (inputs) {
  var data =  endpoint.weather({city: inputs.city});

  return {
  "city": data['city'],
  "temperature": data['temperature'],
  "pressure": data['pressure'],
  "humidity": data['humidity']
  };
  };
From the step.js file, you can invoke JavaScript functions defined in the script files under the scripts folder, as well as functions annotated with @LegacyServiceFunction. The object you return from the step.js function should align with the output structure defined in the step.json file.
Here are examples for the step.json file:
{
  "label": "Random numb",
  "name": "numberGenerator",
  "category": "integrations",
  "description": "Generates a new random number.",
  "inputs": [
    {
      "label": "Bound",
      "name": "bound",
      "type": "text",
      "description": "This is used to get a random number between 0 (inclusive) and the number passed in this argument, exclusive",
      "required": "true",
      "defaultValue": 2000
    }
  ],
  "outputs": [
    {
      "label": "Generated number",
      "name":  "generatedNumber",
      "type": "number",
      "description": "The generated random number"
    }
  ]
}
Inputs examples:
  "inputs": [
    {
      "label": "Operation",
      "name": "operation",
      "type": "choice",
      "defaultValue": "SUM",
      "required": "true",
      "options": {
        "possibleValues": [
          {
            "label": "Sum",
            "name": "SUM"
          },
          {
            "label": "Rest",
            "name": "REST"
          },
          {
            "label": "Division",
            "name": "DIV"
          },
          {
            "label": "Multiplication",
            "name": "MULT"
          }
        ],
        "allowContextSelector": "false"
      }

    },
    {
      "label": "First operand",
      "name": "firstOperand",
      "type": "text",
      "description": "First operand",
      "required": "true"
    },
    {
      "label": "Second operand",
      "name": "secondOperand",
      "type": "text",
      "description": "Second operand",
      "required": "true"
    }
  ]
Output examples:
  "outputs": [
    {
      "label": "result",
      "name":  "result",
      "type": "object",
      "description": "Result object containing temperature, pressure and humidity for the given city"
    }
  ]
  "outputs": [
    {
      "label": "city",
      "name":  "city",
      "type": "text",
      "description": "name of the city"
    },
    {
      "label": "temperature",
      "name":  "temperature",
      "type": "number",
      "description": "temperature for the given city"
    },
    {
      "label": "pressure",
      "name":  "pressure",
      "type": "number",
      "description": "pressure for the given city"
    },
    {
      "label": "humidity",
      "name":  "humidity",
      "type": "number",
      "description": "humidity for the given city"
    }
  ]
For more information about flows you can go to Developer’s reference: Flows Overview