Development process
In this document, we present recommendations for creating a new app in Slingr. While you’re free to follow your own approach, we suggest going through this guide initially to grasp the fundamental path. You can then adapt these guidelines to your specific needs.
The process
At Slingr, we embrace agile methodologies for software development. The platform is designed to facilitate agile implementation while building apps. This means you can swiftly set up a basic app, and gradually evolve and enhance it over time.
Following agile principles, we encourage developers to work in small iterations when creating apps. Start with a simple version that provides some value and can be used by people. Then, gradually add more features and make adjustments as needed.
The iterative cycle typically looks like this:
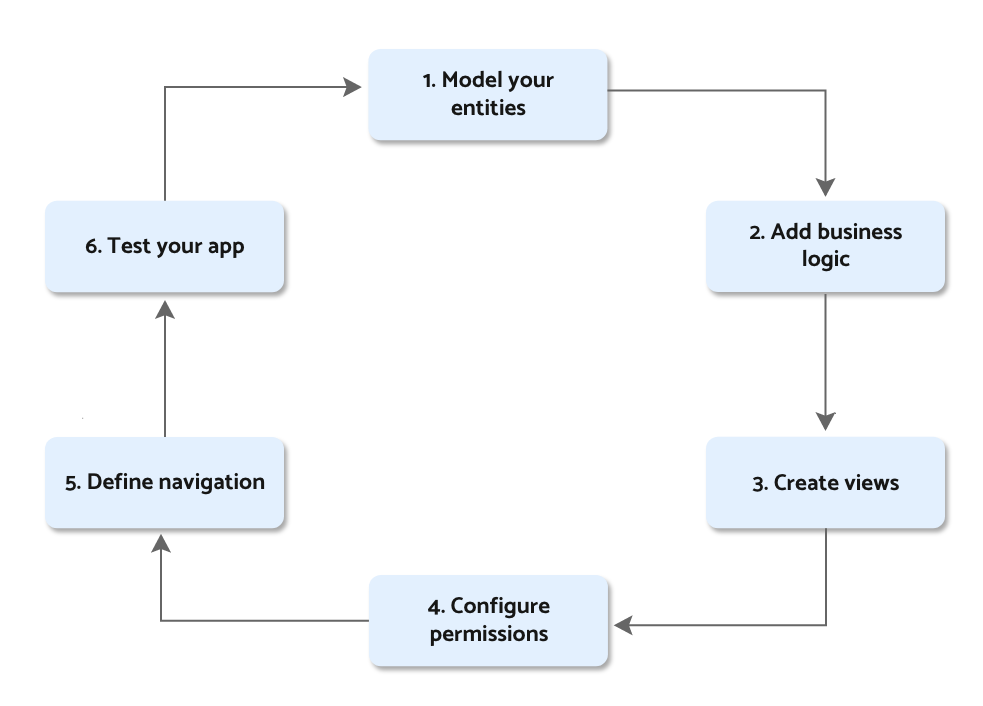
Model Your Entities: Begin by defining your app’s entities, capturing the key aspects of your domain. Start by outlining the structure of fields and a few settings. You’ll refine these settings over time as needed.Add Business Logic: Incorporate elements like actions, listeners, legacy services integrations, scripts for calculated values, and aggregations. These additions will transform your app from a mere record repository into a dynamic system.Create Views: Establish views for your entities. If you’ve introduced new entities, create at least a grid view to support basic CRUD operations. If you already had views, adapt them to match changes in your model.Configure Permissions: Ensure that newly added or modified features are accessible by the appropriate user groups.Define Navigation: Integrate views into menus to enable user-friendly access to app features.Test Your App: Once you’ve established the basics, push the changes and observe your app in action. Seeing your app function provides clarity on the next steps.Iterate to Your Ideal State: Go through this cycle iteratively until you reach a point where you’re satisfied with the results. Slingr supports your journey with features like Automatic Refactorings, auto-generated UI, and the REST API.
Remember, you don’t need to follow all these steps in each iteration. Depending on the changes, some iterations might only affect action scripts, leaving views and permissions unchanged. This is meant as a flexible guideline.
Iterations can be very brief, lasting only a few hours or even minutes, especially in your development environment. However, for syncing to production, consider longer cycles that include well-tested changes.
Best practices
Start light
Avoid attempting to create everything in your initial iteration. Focus on the most critical use cases and establish the fundamentals. Share this version with your users and make improvements based on their feedback. This incremental approach reduces uncertainty and yields an app that aligns closely with user expectations.
Optimize your development environment
Ensure that your development environment provides access to all features, and that they function optimally. For instance, if your app integrates with Slack, create a dedicated Slack team for your development environment to test Slack integrations. Avoid testing in the production environment whenever possible.
Enable comprehensive testing in your development environment. Create accounts for integrated services dedicated to your development environment, allowing developers to access and interact with these services. Having sufficient data in your development environment for various use cases will significantly accelerate development.
Prioritize versioning
When pushing changes, consider creating a backup of your app’s metadata. This safeguard enables you to revert to a previous version if unintended issues arise.
Although you might not want to create version backups after every change, doing so when completing a significant task is wise. Include detailed notes describing the changes made in each version to facilitate future reference.
Handle production sync with care
During synchronization to the production environment, remember that your app will be briefly stopped, changes applied, and then the app restarted. This means your app won’t be accessible to users during this time.
In many cases, downtime could be just a few seconds and won’t impact users. However, extensive changes affecting numerous records, such as field renaming or removal, might extend the downtime. Keep this in mind when planning your synchronization to the production environment.